April 19, 2024

MyNature Animal Tracks MyNature Tree Guide MyNature Animal Tracks MyNature Fishing App

Wintergreen

Late winter hikes are often void of much color as winter still has it’s grip on many plants.  If you keep a close eye to the ground though you may find a beautiful little plant called Wintergreen, Gaultheria procumbens peeking out from under the snow.  Wintergreen doesn’t usually get over 6 inches tall so it can be easily overlooked.  The one thing that should grab your attention are the deep green colored leaves. against the drab winter landscape. The leaves are evergreen, ovate to elliptic in shape from 3/4 of an inch to 2 inches long. If you were to crush a leaf you would notice the distinct odor of wintergreen. It  can be found growing in roughly half  of North America  from the central states North to Maine and up into Canada.  The small red berries of Wintergreen are edible with a minty flavor.  Like most plants there are a variety of names Wintergreen is known by; Canada tea, checkerberry, deerberry, ground berry, hillberry, mountain tea, partridge berry, spiceberry and teaberry.


Happy Hiking !!

Pictures in My Mind

Pictures in My Mind

I stood in silence in the deep snow
bathing in the beauty of my surroundings would be an understatement, I was drowning.
This spot in the woods was just that…a spot. It wasn’t a destination, it didn’t have open vistas, no waterfalls
or colorful leaves………It was just a spot.
Yet that spot held me in its embrace and wouldn’t let go.
Sky the deepest blue,
the river just a whisper, a faint trickle under the ice.
Snow so white it was crisp, sharp like a knife.
Warm air carried the scent of rain.

I tried in vain to capture that moment,
the beauty, the serenity of it all!
A great photographer I’ll never be, yet my mind holds the most vivid pictures I have ever taken.
The colors, the breeze, the aroma…… they’re all there.
A never ending photo album, page after breathtaking page of the most spectacular spots I’ve ever seen.

Few pictures can ever do those moments justice.
Those moments when we realize the perfection of Nature,
of how small we are in this universe. When the simple beauty of the landscape makes you feel …….. complete!

I can never and will never be able to convey the love I felt today.
I’ll never be able to show you the world that I saw, so beautiful, so peaceful, so perfect.
Forever they remain, pictures in my mind.

A Little Bone Makes My Day!

7:10 a.m.  dropped my truck off at the shop for repairs, estimated cost  $300 -$400.00.

7:30 a.m. returned home, no truck means the day off, $240.00 in lost time

10:15 a.m sold a stock in my account for a loss of $330.28

10:16 a.m a thought crossed my mind, could the day possibly get any worse? I had already lost $970.28 and it wasn’t even noon yet.

Yes, it was time to get outdoors, I’d had enough. Something about being outside always cheers me up.  I’m not quite sure what it is, the solitude, the wildlife, the scenery, fresh air ……… maybe it’s a mix of them all. Whatever it is, I love it.  I packed my camera bag threw the tripod over my shoulder and headed for the ridge out back. I figured I’d try to get a shot at the deer that bed down in the Balsams seeking a little break from the winter wind.

11:37 a.m. I hit the mother load!….. I found gold.  No… not that shiny yellow stuff that’s really heavy. I mean, you can’t buy anything with this gold but none the less it’s gold to me.  Twenty five yards off the trail of deer tracks I was following something caught my eye. It just didn’t look right,  a little to much shine maybe, the color, or maybe that the point just looked to rounded.

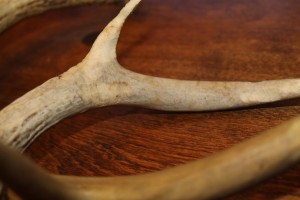
Antler!!

There’s just nothing quite like the excitement of finding a shed antler. If you’ve never experienced it you just wouldn’t understand. Here in the Adirondacks finding a shed amongst all the blow down and fallen pine branches is akin to finding the proverbial needle in the haystack.  So is this one worth $970.28?  No, in dollars it isn’t worth much, you could sell a single shed for maybe 10 bucks on Ebay. I learned long ago that everything doesn’t have a monetary value.  This piece of bone is worth much more than the cash I lost today.  Twenty years from now when I hold that antler in my hands, I’ll look back in my mind and I’ll be 48 again. I’ll be working my way up a that ridge, pulling my collar a little higher to fight the chill, smelling the Balsam that brush against my sleeve. Clearly in my mind it lays there,  a glint of sunlight on the tine. I’ll relive the excitement of my find. I’ll remember, I’ll remember and I’ll  smile.

Today I lost nearly $1,000.00 but I made a memory, a priceless moment that will last forever.  I found a bone, an antler, a piece of nature, an experience. Something money can’t buy and I’m all the richer for it.

Enjoy the Outdoors

Scared of Scientific Names?

Scientific names, Picea rubens,   some people cringe at just the thought.  You know they’re really not that bad, with a little practice you can start to decipher what they actually mean. The first part of the key is the family name.

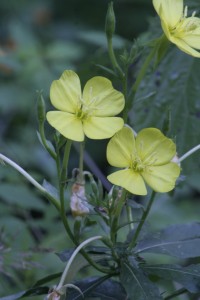
Common Evening Primrose, Oenothera biennis

Every living organism, plant or animal belongs to a family. The family name is probably the hardest part to memorize. The second part of a scientific name is the individual species. This part is descriptive. It usually describes a color, trait, location or something of that nature.

In Picea rubens for example Picea is the family name for Spruce and rubens is the Latin word for the color red, hence the common name, Red Spruce.  A species may also be named in honor or recognition of a person.  Mimulus lewisii is a species of monkeyflower named after the famous explorer Meriwether Lewis of the Lewis and Clark expedition.

Many species names will lead you toward the more common name, niger (black), spinosa (spiny), grandifolia (large foliage), canadensis (of Canada), quadrangulata (four sided) and linearis (linear). Those are just several of the hundreds to thousands of scientific names that are in use.

So does it mean your a geek if you know your scientific names? Not at all, in fact it’s quite rewarding to to be able to hear or read some of the terminology and understand what their talking about. Latin isn’t the only language used either. In fact, one of my favorite scientific names of all times has a Japanese origin, Tsuga canadensis.  Go ahead, say it to yourself…… “Tsuga canadensis” ……sounds awesome doesn’t it?  In short you just said Canadian Hemlock.

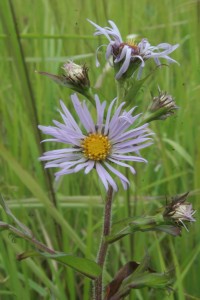
New England Aster, Aster novae-angliae. Aster is the Family, novae is Latin for new and angliae means english or England

Bottom line is, there’s no need to roll your eyes. Scientific names don’t have to be complex and boring to learn. It’s my guess you’ll actually enjoy using them. So get outside and find me some Solidago, er, ummm    ………..   Goldenrod.   Is that another cool name or what? Solidago, ya gotta luv it!!


Enjoy the Outdoors

MyNature Tree App, it’s good for what ails ya!!

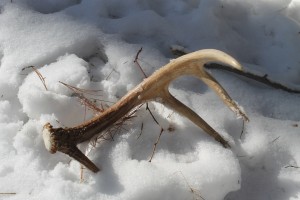
Shed Hunting

It’s that time of year again, the time when whitetails  start dropping their antlers.  Here in the Adirondacks the majority of  bucks start shedding right around Christmas. This year they seem to be a little late as I just saw a big 10 pointer last night with a matching set still on his head.  On the 6th of January I spotted a buck with half a rack which means he probably shed the other antler earlier that day or on the 5th.  Antler hunting can have some big rewards and some big headaches. Anytime you find an antler whether it be a spike horn or half a rack, it’s a special moment. Here in the mountains where White Pine and Balsam branches litter the landscape it can be next to impossible to find an antler on the forest floor.  After awhile all those branches start to look a lot  like antlers.

Can you find the antler?

A few years back  I  spotted a huge 10 pt. buck one evening who had just shed his left side that day. I knew it was that day because I had seen him the night before.  I probably spent a total of 40 hours looking for that shed and never found it, to this day I still find myself looking.  While I searched for that shed I passed by another antler at least a dozen times  lying amongst the dead pine branches until I finally saw it. They blend in that well.

A couple of inches of snow can be a big help when shed hunting. Snow does three things for you. One:  it covers most if not all the dead and downed branches. Two: deer are much easier to trail in the snow you can follow their tracks right to their bedding areas  where the probability of finding a shed is the greatest. Three:  dropped antlers show up in fresh snow like a beacon from a lighthouse. On the other hand too much snow especially several inches of light fluffy snowflakes will make it nearly impossible to find a shed.

Your not the only one who’ll be excited to find a shed antler. Rodents and there are many of them love calcium.  It just so happens that antlers are made up of none other than ….. you guessed it, Calcium!  Squirrels, mice, and porcupines, they all love antlers.  If you find an antler that’s been lying around for a while chances are that it has chew marks on it or it has been partially devoured already.

rodent chewed antler

The most important thing about shed hunting to remember is don’t get discouraged. It takes a certain amount of luck to find an antler laying in the middle of nowhere. There are years I turn up empty handed. The great thing is your outdoors with fresh air and sunshine. A little bit of nature goes along way on a winter day.   Enjoy!!

How to Make a Plaster Cast of Animal Tracks

Making a plaster cast of an animal track is fairly simple and there’s only a few inexpensive materials you’ll need.

  • Plaster of Paris – you can find this at any hardware or home improvement store. It comes in a 5 pound box shaped like a milk carton.  One box is plenty for most tracks.  I carry my plaster in a ziploc freezer bag.
  • Cardboard or heavy paper strips to make a dam or enclosure around the track to pour the plaster in. You can just use mud, sticks or rocks and skip carrying the paper strips.
  • Spoon or knife for mixing, again you can use a stick and eliminate carrying extra tools and weight.
  • Paper clip or picture hanger to insert in the cast if you wish to hang it on a wall.
  • Water, you can carry water with you but I always carry 1 or 2 extra ziploc bags to gather my own water after I find a track to cast. I may have to hike a ways to gather water but it’s much easier than carrying extra weight around all day.

The video below will show you step by step on how to plaster cast an animal track.   Enjoy and enjoy the Outdoors!!

Plaster Casting Animal Tracks

Caribou Tracks

Caribou are one of the most traveled animals on the planet. They may travel  hundreds to thousands of miles each year going from  summer to winter range and back again.  If you were to visit Alaska or parts of Canada you would eventually cross their tracks. Identifying their tracks is fairly easy.

Caribou tracks are very distinctive, being nearly round in shape. Their hoof has two toes like other deer but rather than triangular or tear drop in shape each toe on a Caribou is crescent shaped. The overall shape of their foot  allows them to stay up on top of the snow better.   Caribou tracks measures between 4 to 5 inches long.


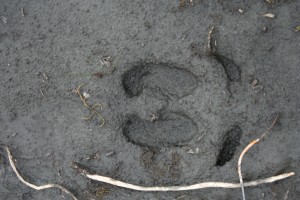
This track  below shows a good example of a Caribous dew claws which are often present. Their dew claws help them from sinking in the deep snows.


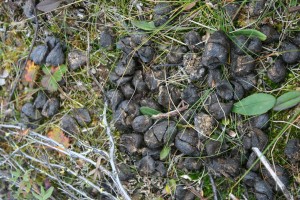
Caribou scat resembles that of most deer. It can either be in a loose pellet form or clumped pellets resulting from from a succulent diet. The scat measures from 1/2 to 5/8 of an inch in diameter.

A Caribous diet depending on the time of year consists of lichens, moss, leaves, grasses and fungi.


One of the few tracks that would overlap the range of Caribou would be that of the Moose. Moose tracks have the more common heart or tear dropped shape to them. There shouldn’t be any confusion in the two just based on their shape.  Moose scat is roughly 3/4 of an inch in diameter and the pellets are around 1 inch long, much larger than the scat of Caribou.


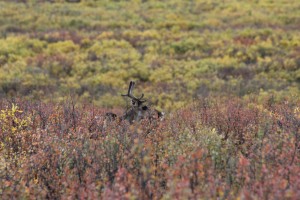
Do you think it’s a male or female in this image?

Yes, it’s a trick question, both sexes have antlers but we’ll  never know which one this is. I didn’t get close enough to find out.

Enjoy the Outdoors !!


Beaver Tracks & Sign

Beavers  tracks and sign can be found just about everywhere in North America, at least everywhere there’s a water source. Besides water there also has to be an ample amount of trees to fulfill their dietary needs, birch, willow and aspen to name a few. Beavers, Castor canadensis aren’t the most secretive animal inhabiting the land, if their around you’ll find evidence of their sign everywhere, dams, lodges, wood chips, felled trees, stumps and scent posts.


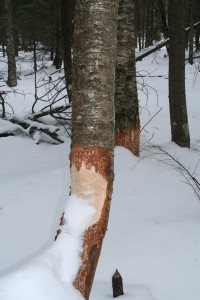
The tree in this picture at right was chewed by a beaver. Beavers eat the inner bark or cambium layer of trees. They also  fell tree to get at the buds, leaves and newer, younger branches.


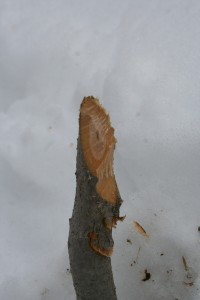
This image on the left shows a closeup of what a beaver chew looks like. Beavers as do other rodents chew at a 45 degree angle. You might find their chews several feet off the ground in the spring and summer months which would mean that that particular chew was made while the snow was deep sometime during the winter.

Beavers have unique tracks, some times their hard to find because  they drag their tail as well as  branches as they amble along. The tail and dragging branches will obscure their tracks if not wipe them out all together.


Here’ a perfect example of a beaver drag. In this particular picture the drag was about 5 foot wide  obscuring all tracks that the beaver had left.

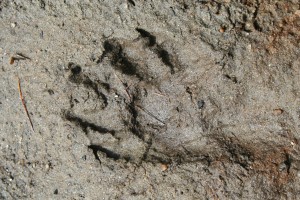
If you do find a nice clear set of tracks most likely they’ll be in the mud on the waters edge. Their front feet resemble small human like hands 2.5 to 3 inches long with 5 toes. Often times the front foot may only show 4 toes in the tracks but they’ll still look like long fingers with claws at the ends. A beavers rear track can be up to 7 inches long and looks somewhat triangular in shape. The hind tracks also have 5 toes and you should see some evidence of webbing between them. Claw marks should also be present in the tracks.  Beavers have a gait pattern of a pacer, meaning all four of their feet will register independently. Some times however the hind tracks will  register on top of the front ones. With the wide tail drag and the unmistakable sign they leave you shouldn’t have any trouble identifying beaver tracks or mixing them up with any other mammals.

A good place to look for  beaver tracks  is  along  the muddy edges of their dams.  You should also be able to find the spots they enter and exit the water.  Beavers will use the same entry and exit points along the shore to go out and forage for food. Many times these trails will be churned up mud and their tracks will be evident. I have found some of my best beaver tracks on the winter ice where there’s a light snow cover.  If you see an open hole in the ice with sticks or branches strewn about you may be able to find some good tracks there, just make sure the ice is at least 3 inches thick before you venture onto it.

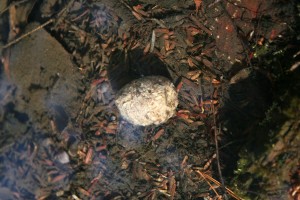
One of the  other signs that beavers leave are their scat. Beaver scat can be very difficult to find since most times it’s deposited underwater, but if you know where to look it will be much easier to spot.  Beaver scat is in the shape of a pellet either round or elongated, about 3/4 to 1 inch in diameter.  Their scat resembles  wood chips or sawdust stuck together and is usually a light brown to tan color. If you look at the well worn entry trails into the water you may find scat just under the waters surface or at the edge of their dam. The pellets are usually scattered or solitary not found in a large pile like that of a deer or rabbit would be.


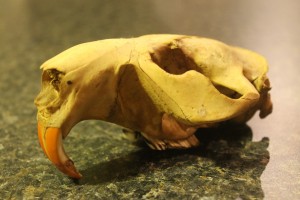
I found this adult beaver skull stuck in a dam on one of my outings a few years back.  This shows a perfect example of the their incisors. The incisors are orange colored from the iron in the beavers diet.   I don’t know how it met its demise but it will made an excellent addition to my skull collection.


If you stumble across beaver habitat on your next outing scout around and see if you can locate some tracks or scat. Learning how to identify animal sign and the creatures that left them can be a very rewarding experience.

Happy Hiking !!


If you carry it in, you carry it out, please put litter in it’s place!!!


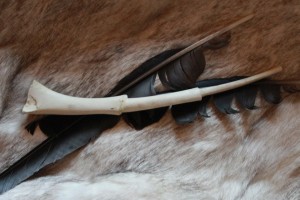
Turkey Wing Bone Call

Turkey for dinner tonight??   Before you throw out those wings here’s a perfect project to do with the kids or by yourself for that matter.  People have been making calls out of wing bones for centuries, Native Americans regularly made and used them in their hunts.   There’s nothing special required to do it and it only takes about an hour and a half start to finish.  Here’s what you’ll need for material.

  • 1 turkey wing
  • small hacksaw blade
  • hanger wire or other piece of thin wire
  • pipe cleaners (optional)
  • glue (either carpenters glue, epoxy, or I prefer Gorilla Glue)
  • 1 cotton ball (optional)
  • knife blade or tool for scraping

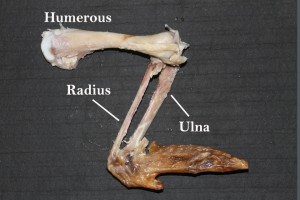
Your first step is to remove all the meat from the wing to expose the bones. Your going to be utilizing 3 bones in the wing, the humerus, radius and the ulna.

You can use a knife blade to scrape the meat and tendons away.  You want to get right down to the bone.   

Next you want to take a hacksaw blade or or other cutting tool and remove the ends from your three wing bones.  Be careful when sawing not to shear the bone off, it’s better to just cut on the pull and not the push with your hacksaw blade.     

Overlay the bones so you’ll have an idea of where to cut them, you want the bones to fit inside one another, the ulna slides into the humerus and the radius slides into the ulna.  You can cut them again or scrape them down if they don’t fit quite right a little later on. Take your three wing bones and place them in a pot of boiling water. This will loosen up any meat or tendons you missed and also soften the marrow inside. 

Adding a little bleach to the water when it’s boiling will whiten the bone or you canadd some color by boiling in some coffee grounds, pine bark, chestnut husks or some other organinc material that will make a dye.

                                                                                                                                                                                                                                                                                                                                                     The important step here is to scrape out the marrow so you end up with a hollow bone. The marrow is fairly easy to remove from the radius and ulna but a little more difficult to get the fat end of the humerus clean.  You can use a pipe cleaner at this points to try and get the sides cleaned. The fat end of the humerus will have a honeycomb appearance to it. You need to carefully remove this portion, keep picking at the  end with your wire or knife point until you have most of the bone open.  Once you have all three bones cleaned and hollowed out you can dry fit them again to see how they fit each other. You can sand or scrap the inside or outside of the bones until they fit somewhat snugly.  Once you have them dry fitted you can move onto the final step, gluing them together.

If you are going to use wood glue you’ll want to tuck some cotton around the edges of where your bones join. The cotton once soaked with the glue will make an airtight seal. I personally like to use Gorilla Glue, wipe a little on the end that will go inside the other. You don’t need a lot, a little goes along way. The Gorilla Glue will expand and make its own airtight seal. Any excess glue that over expands can just be cut or scrapped off once its dry, you’ll have a nice solid joint with the Gorilla Glue.  Once your three pieces are all joined, glued and dried you can take a little sand paper and smooth down any rough edges and clean up your call a little. You can go a few steps further by adding a lanyard, engraving or decorating the bone.

Ok, now that you’ve made a wing bone call how do you use it?  Easy, just place the call between your lips (the narrow end) and kiss the call, sucking air in while you pucker. It may taste a little funny at first but with time that will disappear.  You can change the pitch and tone of your call by cupping your hands over the end and opening and closing them while calling.  Check out a few Youtube videos on how to make a yelp or cutting sound.

As I mentioned above you don’t have to be a hunter to use a turkey call.  Take it with you hiking or bird watching and try it out. There are few things more exciting in nature than hearing a Tom gobble back to your call. 


Enjoy the Outdoors!!


Shooting the Moon

I’m not a professional photographer by any means but I do love to dabble in it. The past few days I’ve been trying to get a decent moon shot rising on the horizon, without much success I might add.  I did Google the how to’s of it and most of the sites I visited just got a little to technical for my tastes…… actually it’s not my tastes it’s more my attention. As soon as something starts getting  to in depth in the instructions I’m lost. I’ve never had the patience to listen to technical explanations, just tell me how to do it and that’s all I want to know.  That said without further ado here is how to get a shot like this.  (Note: I’m using a Cannon Rebel T3)

  • Set your camera to manual which is on the selection dial and represented by an “M”
  • Select an ISO of 100 (ISO is the speed of your film, 100 speed, 200 speed etc.)
  • Dial your shutter speed to read 1/100
  • Set your F stop to read f/11 ( to select an F stop press and hold the AV button and spin the selection dial to go up or down the F stop menu
  • You should be using at least a 300mm lens to bring the moon in closer.
  • A tripod is highly recommended and use your timer to take the image.

You may need to go up or down in F stops to get the best image but you should stay within the range of f/8 to f/11.  Shoot a few images at each F stop to be sure. You may also increase and decrease your shutter speeds and take a few images as well….. this is called “Bracketing” your shot. While you may capture a good image at  a shutter speed of 1/100th it may be even better at 1/160th.  Now without getting you to confused you can also select an ISO of 200 and a shutter speed of 1/200 keeping your F stop again between f/8 and f/11, adjust speeds and stops up or down as needed.  Again bracket your shots by shooting more images to be sure you capture the best shot, you can’t take enough pictures and the cost is zero with digital images. I’ve dialed my shutter speed all the way down to 1/60 th  with an f/11 and captured a good image.  Just remember that a f stop of 11 and a shutter speed of 1/100 th are good starting points, you may need to adjust from there but they should get you in the ballpark.

A couple other suggestions that might help you out.

Invest in a remote trigger to trip your shutter. I purchased the Phottix Stratto, I think it was around $80 bucks and I have never been happier with a purchase.  This eliminates the need for using your self timer and it takes a lot of the residual shake out of your camera after you press the shutter button. It has so many uses, self portraits for group shots, still photos, which will allow you to shadow out the sun from your subject from any point, which you can’t do while manually holding the camera without setting up sun screens.  I can’t say enough good things about the remote trigger and the cost is low enough to justify.

Lenses…… if your going to buy a lens buy a good one, trust me on this. When I started out I picked up a Cannon 75-300mm EF Zoom, it did not have an image stabilizer and I can’t get over how many shots I couldn’t capture because of the lack of a stabilizer and I curse that purchase to this day. I should clarify the above statement, I did capture the images but the quality was terrible, usually blurred, so many once in a lifetime pictures end up deleted. If you can’t afford the more expensive lens then wait, wait, wait and wait some more, save your money until you can, you won’t be disappointed in the long run and your pictures will be 1000 times better.

Invest in a Photoshop program, you can find inexpensive ones on Ebay, I think I paid $150.00 for  Photoshop 3. I’m still learning it and there is a lot to learn believe me. Some of the basic tools will allow you to brighten or darken an image, remove an unwanted subject in a pic like a telephone pole or street sign, stitch images together for a panoramic view. The possibilities are endless but the point is you can take a mediocre shot and make it spectacular. The shot above with the moon I simply cropped and brightened just a pinch to highlight the moon a little more.

Good luck shooting the moon and if you have any tips feel free to leave them here…. but don’t get to technical…..   : )      Happy Hiking!!