May 2, 2024

MyNature Animal Tracks MyNature Tree Guide MyNature Animal Tracks MyNature Fishing App

Archives for 2011

How to Make a Plaster Cast of Animal Tracks

Making a plaster cast of an animal track is fairly simple and there’s only a few inexpensive materials you’ll need.

  • Plaster of Paris – you can find this at any hardware or home improvement store. It comes in a 5 pound box shaped like a milk carton.  One box is plenty for most tracks.  I carry my plaster in a ziploc freezer bag.
  • Cardboard or heavy paper strips to make a dam or enclosure around the track to pour the plaster in. You can just use mud, sticks or rocks and skip carrying the paper strips.
  • Spoon or knife for mixing, again you can use a stick and eliminate carrying extra tools and weight.
  • Paper clip or picture hanger to insert in the cast if you wish to hang it on a wall.
  • Water, you can carry water with you but I always carry 1 or 2 extra ziploc bags to gather my own water after I find a track to cast. I may have to hike a ways to gather water but it’s much easier than carrying extra weight around all day.

The video below will show you step by step on how to plaster cast an animal track.   Enjoy and enjoy the Outdoors!!

Plaster Casting Animal Tracks

Caribou Tracks

Caribou are one of the most traveled animals on the planet. They may travel  hundreds to thousands of miles each year going from  summer to winter range and back again.  If you were to visit Alaska or parts of Canada you would eventually cross their tracks. Identifying their tracks is fairly easy.

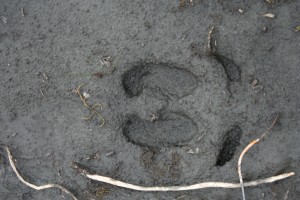
Caribou tracks are very distinctive, being nearly round in shape. Their hoof has two toes like other deer but rather than triangular or tear drop in shape each toe on a Caribou is crescent shaped. The overall shape of their foot  allows them to stay up on top of the snow better.   Caribou tracks measures between 4 to 5 inches long.


This track  below shows a good example of a Caribous dew claws which are often present. Their dew claws help them from sinking in the deep snows.


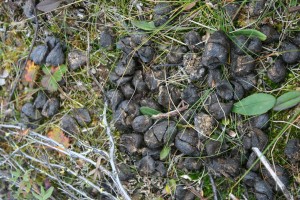
Caribou scat resembles that of most deer. It can either be in a loose pellet form or clumped pellets resulting from from a succulent diet. The scat measures from 1/2 to 5/8 of an inch in diameter.

A Caribous diet depending on the time of year consists of lichens, moss, leaves, grasses and fungi.


One of the few tracks that would overlap the range of Caribou would be that of the Moose. Moose tracks have the more common heart or tear dropped shape to them. There shouldn’t be any confusion in the two just based on their shape.  Moose scat is roughly 3/4 of an inch in diameter and the pellets are around 1 inch long, much larger than the scat of Caribou.


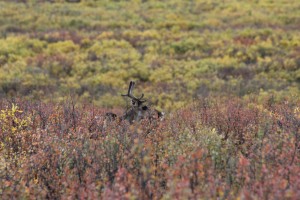
Do you think it’s a male or female in this image?

Yes, it’s a trick question, both sexes have antlers but we’ll  never know which one this is. I didn’t get close enough to find out.

Enjoy the Outdoors !!


Beaver Tracks & Sign

Beavers  tracks and sign can be found just about everywhere in North America, at least everywhere there’s a water source. Besides water there also has to be an ample amount of trees to fulfill their dietary needs, birch, willow and aspen to name a few. Beavers, Castor canadensis aren’t the most secretive animal inhabiting the land, if their around you’ll find evidence of their sign everywhere, dams, lodges, wood chips, felled trees, stumps and scent posts.


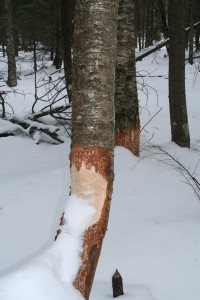
The tree in this picture at right was chewed by a beaver. Beavers eat the inner bark or cambium layer of trees. They also  fell tree to get at the buds, leaves and newer, younger branches.


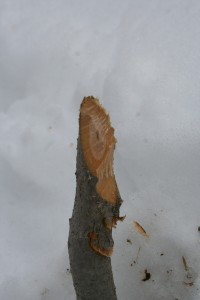
This image on the left shows a closeup of what a beaver chew looks like. Beavers as do other rodents chew at a 45 degree angle. You might find their chews several feet off the ground in the spring and summer months which would mean that that particular chew was made while the snow was deep sometime during the winter.

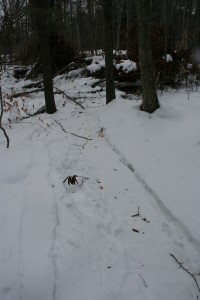
Beavers have unique tracks, some times their hard to find because  they drag their tail as well as  branches as they amble along. The tail and dragging branches will obscure their tracks if not wipe them out all together.


Here’ a perfect example of a beaver drag. In this particular picture the drag was about 5 foot wide  obscuring all tracks that the beaver had left.

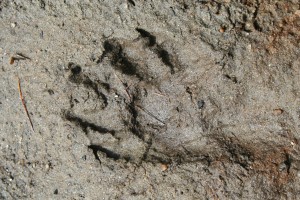
If you do find a nice clear set of tracks most likely they’ll be in the mud on the waters edge. Their front feet resemble small human like hands 2.5 to 3 inches long with 5 toes. Often times the front foot may only show 4 toes in the tracks but they’ll still look like long fingers with claws at the ends. A beavers rear track can be up to 7 inches long and looks somewhat triangular in shape. The hind tracks also have 5 toes and you should see some evidence of webbing between them. Claw marks should also be present in the tracks.  Beavers have a gait pattern of a pacer, meaning all four of their feet will register independently. Some times however the hind tracks will  register on top of the front ones. With the wide tail drag and the unmistakable sign they leave you shouldn’t have any trouble identifying beaver tracks or mixing them up with any other mammals.

A good place to look for  beaver tracks  is  along  the muddy edges of their dams.  You should also be able to find the spots they enter and exit the water.  Beavers will use the same entry and exit points along the shore to go out and forage for food. Many times these trails will be churned up mud and their tracks will be evident. I have found some of my best beaver tracks on the winter ice where there’s a light snow cover.  If you see an open hole in the ice with sticks or branches strewn about you may be able to find some good tracks there, just make sure the ice is at least 3 inches thick before you venture onto it.

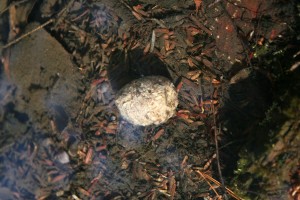
One of the  other signs that beavers leave are their scat. Beaver scat can be very difficult to find since most times it’s deposited underwater, but if you know where to look it will be much easier to spot.  Beaver scat is in the shape of a pellet either round or elongated, about 3/4 to 1 inch in diameter.  Their scat resembles  wood chips or sawdust stuck together and is usually a light brown to tan color. If you look at the well worn entry trails into the water you may find scat just under the waters surface or at the edge of their dam. The pellets are usually scattered or solitary not found in a large pile like that of a deer or rabbit would be.


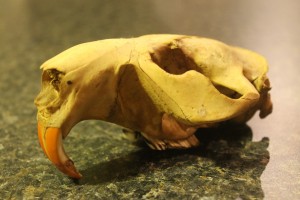
I found this adult beaver skull stuck in a dam on one of my outings a few years back.  This shows a perfect example of the their incisors. The incisors are orange colored from the iron in the beavers diet.   I don’t know how it met its demise but it will made an excellent addition to my skull collection.


If you stumble across beaver habitat on your next outing scout around and see if you can locate some tracks or scat. Learning how to identify animal sign and the creatures that left them can be a very rewarding experience.

Happy Hiking !!


If you carry it in, you carry it out, please put litter in it’s place!!!


Turkey Wing Bone Call

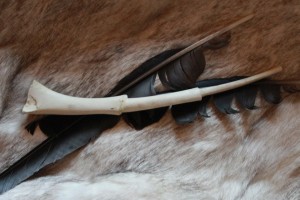
Turkey for dinner tonight??   Before you throw out those wings here’s a perfect project to do with the kids or by yourself for that matter.  People have been making calls out of wing bones for centuries, Native Americans regularly made and used them in their hunts.   There’s nothing special required to do it and it only takes about an hour and a half start to finish.  Here’s what you’ll need for material.

  • 1 turkey wing
  • small hacksaw blade
  • hanger wire or other piece of thin wire
  • pipe cleaners (optional)
  • glue (either carpenters glue, epoxy, or I prefer Gorilla Glue)
  • 1 cotton ball (optional)
  • knife blade or tool for scraping

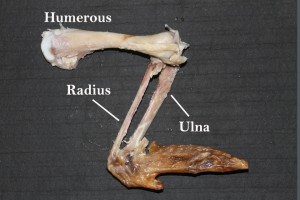
Your first step is to remove all the meat from the wing to expose the bones. Your going to be utilizing 3 bones in the wing, the humerus, radius and the ulna.

You can use a knife blade to scrape the meat and tendons away.  You want to get right down to the bone.   

Next you want to take a hacksaw blade or or other cutting tool and remove the ends from your three wing bones.  Be careful when sawing not to shear the bone off, it’s better to just cut on the pull and not the push with your hacksaw blade.     

Overlay the bones so you’ll have an idea of where to cut them, you want the bones to fit inside one another, the ulna slides into the humerus and the radius slides into the ulna.  You can cut them again or scrape them down if they don’t fit quite right a little later on. Take your three wing bones and place them in a pot of boiling water. This will loosen up any meat or tendons you missed and also soften the marrow inside. 

Adding a little bleach to the water when it’s boiling will whiten the bone or you canadd some color by boiling in some coffee grounds, pine bark, chestnut husks or some other organinc material that will make a dye.

                                                                                                                                                                                                                                                                                                                                                     The important step here is to scrape out the marrow so you end up with a hollow bone. The marrow is fairly easy to remove from the radius and ulna but a little more difficult to get the fat end of the humerus clean.  You can use a pipe cleaner at this points to try and get the sides cleaned. The fat end of the humerus will have a honeycomb appearance to it. You need to carefully remove this portion, keep picking at the  end with your wire or knife point until you have most of the bone open.  Once you have all three bones cleaned and hollowed out you can dry fit them again to see how they fit each other. You can sand or scrap the inside or outside of the bones until they fit somewhat snugly.  Once you have them dry fitted you can move onto the final step, gluing them together.

If you are going to use wood glue you’ll want to tuck some cotton around the edges of where your bones join. The cotton once soaked with the glue will make an airtight seal. I personally like to use Gorilla Glue, wipe a little on the end that will go inside the other. You don’t need a lot, a little goes along way. The Gorilla Glue will expand and make its own airtight seal. Any excess glue that over expands can just be cut or scrapped off once its dry, you’ll have a nice solid joint with the Gorilla Glue.  Once your three pieces are all joined, glued and dried you can take a little sand paper and smooth down any rough edges and clean up your call a little. You can go a few steps further by adding a lanyard, engraving or decorating the bone.

Ok, now that you’ve made a wing bone call how do you use it?  Easy, just place the call between your lips (the narrow end) and kiss the call, sucking air in while you pucker. It may taste a little funny at first but with time that will disappear.  You can change the pitch and tone of your call by cupping your hands over the end and opening and closing them while calling.  Check out a few Youtube videos on how to make a yelp or cutting sound.

As I mentioned above you don’t have to be a hunter to use a turkey call.  Take it with you hiking or bird watching and try it out. There are few things more exciting in nature than hearing a Tom gobble back to your call. 


Enjoy the Outdoors!!


Shooting the Moon

I’m not a professional photographer by any means but I do love to dabble in it. The past few days I’ve been trying to get a decent moon shot rising on the horizon, without much success I might add.  I did Google the how to’s of it and most of the sites I visited just got a little to technical for my tastes…… actually it’s not my tastes it’s more my attention. As soon as something starts getting  to in depth in the instructions I’m lost. I’ve never had the patience to listen to technical explanations, just tell me how to do it and that’s all I want to know.  That said without further ado here is how to get a shot like this.  (Note: I’m using a Cannon Rebel T3)

  • Set your camera to manual which is on the selection dial and represented by an “M”
  • Select an ISO of 100 (ISO is the speed of your film, 100 speed, 200 speed etc.)
  • Dial your shutter speed to read 1/100
  • Set your F stop to read f/11 ( to select an F stop press and hold the AV button and spin the selection dial to go up or down the F stop menu
  • You should be using at least a 300mm lens to bring the moon in closer.
  • A tripod is highly recommended and use your timer to take the image.

You may need to go up or down in F stops to get the best image but you should stay within the range of f/8 to f/11.  Shoot a few images at each F stop to be sure. You may also increase and decrease your shutter speeds and take a few images as well….. this is called “Bracketing” your shot. While you may capture a good image at  a shutter speed of 1/100th it may be even better at 1/160th.  Now without getting you to confused you can also select an ISO of 200 and a shutter speed of 1/200 keeping your F stop again between f/8 and f/11, adjust speeds and stops up or down as needed.  Again bracket your shots by shooting more images to be sure you capture the best shot, you can’t take enough pictures and the cost is zero with digital images. I’ve dialed my shutter speed all the way down to 1/60 th  with an f/11 and captured a good image.  Just remember that a f stop of 11 and a shutter speed of 1/100 th are good starting points, you may need to adjust from there but they should get you in the ballpark.

A couple other suggestions that might help you out.

Invest in a remote trigger to trip your shutter. I purchased the Phottix Stratto, I think it was around $80 bucks and I have never been happier with a purchase.  This eliminates the need for using your self timer and it takes a lot of the residual shake out of your camera after you press the shutter button. It has so many uses, self portraits for group shots, still photos, which will allow you to shadow out the sun from your subject from any point, which you can’t do while manually holding the camera without setting up sun screens.  I can’t say enough good things about the remote trigger and the cost is low enough to justify.

Lenses…… if your going to buy a lens buy a good one, trust me on this. When I started out I picked up a Cannon 75-300mm EF Zoom, it did not have an image stabilizer and I can’t get over how many shots I couldn’t capture because of the lack of a stabilizer and I curse that purchase to this day. I should clarify the above statement, I did capture the images but the quality was terrible, usually blurred, so many once in a lifetime pictures end up deleted. If you can’t afford the more expensive lens then wait, wait, wait and wait some more, save your money until you can, you won’t be disappointed in the long run and your pictures will be 1000 times better.

Invest in a Photoshop program, you can find inexpensive ones on Ebay, I think I paid $150.00 for  Photoshop 3. I’m still learning it and there is a lot to learn believe me. Some of the basic tools will allow you to brighten or darken an image, remove an unwanted subject in a pic like a telephone pole or street sign, stitch images together for a panoramic view. The possibilities are endless but the point is you can take a mediocre shot and make it spectacular. The shot above with the moon I simply cropped and brightened just a pinch to highlight the moon a little more.

Good luck shooting the moon and if you have any tips feel free to leave them here…. but don’t get to technical…..   : )      Happy Hiking!!

Winter Light

I got caught up in tracking a pretty good sized buck the other day, he led me on quite a hike up one ridge and down another. As always when I’m outdoors my mind starts thinking of this and that and anything in between. That night there was a beautiful moon and the night was just perfect! I came up with this poem when I finally decided to head for home.

Winter Light

The deep woods hold me long today
a mile from home the sunset fades
December nights fall quick and cold
but on this night a full moon grows
casting shadows of spruce and fir
awed in beauty of Natures paint

A smile grows, a word just muttered
“amazing”
I lived to see the perfect night
the woods so still, cold, so bright
my soul was touched, my life complete
I felt the awe the world can be.

my life awaits, a mile from here
the north wind bites, a frozen tear
December night a full moon glows
light for me the way back home

Happy Hiking!!

Findmysoft.com, Aimal Track App Review.

Were very pleased to post the latest review of the MyNature Animal Track App. The app was reviewed by George Norman of findmysoft.com Thank you George!!


I’m a fan of the AMC TV series “The Walking Dead” and one thing that always impresses me is how Darryl (played by Norman Reedus, actor you may know from The Boondock Saints) can track animals and people in the forest. If that were me, and I’m not ashamed to admit it, I would be in a lot of trouble. My tracking skills are, well, less than spectacular.

Whenever I need help with something, I turn to software for a helping hand. There are apps out there for everything I can think of and that includes tracking animals in the forest. The MyNature Inc-developed and appropriately named app MyNature Animal Tracks is the one that will come to my aid in this situation.

When you’re out fishing or hiking or doing something else and you see a set of tracks, take out your iPhone, launch the MyNature Animal Tracks app and it will help you figure out what animals left those tracks, which way the animal is heading, and how long ago the animal left those tracks.

The developer advises anyone who wants to get the MyNature Animal Tracks app to ask themselves a few questions and if the answer to those questions is affirmative, then go ahead and get the app. Those questions are:
Are you looking for an easy and fun way to identify animal tracks and scat?
Did you always wish you knew how to identify tracks you were finding?
Do you want to make your time outdoors more educational and enjoyable?

You don’t have to be an expert to identify tracks in the wild; you just need the right app to help you out. That app is MyNature Animal Tracks. It is a user-friendly app with a large database that will help you identify what animals left the set of tracks you’re looking at and how long ago those tracks were made. If you’re an outdoorsy type of man who needs this sort of functionality, you’re very well advised to get the MyNature Animal Tracks app.

What we like

  • Easy to use
  • Nice interface
  • Large database with illustrations and beautiful photos
  • Sound files for an example of each animal’s vocalization
  • Doesn’t need internet access
  • Built-in ruler
  • Journal
  • Numerous rave reviews from the media and the users
MyNature Animal Tracks Editor’s Review Rating

MyNature Animal Tracks has been reviewed by on 08 Dec 2011. Based on the user interface, features and complexity, Findmysoft has rated MyNature Animal Tracks 5 out of 5 stars, naming it Essential


Where Did All the Bees Go??

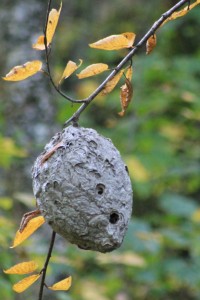
Right around this time of year when the leaves have dropped you’ll start seeing all the hidden bees nests of summer. The paper nests hanging from tree branches are most likely those of the Bald Faced Hornet.  I don’t think there are many signs in nature that can make  a person stop in their tracks as fast as a bees nest can.  This time of year though there’s a good chance the nests are empty. So where do all the bees go?  They die!!….. most do anyway. In the Fall the new queen bees that have hatched leave the nest to hibernate. They may hibernate underground, in tree cavities, old buildings or even nests of other animals or insects. The old queen and worker bees die of exposure to cold temperatures or from starvation and the nest is left abandoned. The next Spring the queen bees  form new colonies and  nests of their own where the process starts again.
The eggs she lays hatch into worker bees, their purpose in life is to construct a new nest. The bees chew wood fibers and mix it with their saliva to make a wet paste. They spread the paste with their legs and mouth part and it dries into a paper like substance. The papery exterior of the nest protects the hive inside.  Once the leaves fall off the trees the nests don’t fair to well being fully exposed to the elements and begin to fall apart from the heavy rains and strong winds. So now you know, mystery  solved … where did all the bees go!

Enjoy Nature!!


MyNature App for Calculating Fish Weight

Next time you bring your iPhone or Droid fishing you can leave the scale back at home.  MyNature Apps just released the app for calculating a fish’s weight by utilizing just two measurements of your catch.  By measuring the length and girth of your fish, entering those two measurements into their correct field and selecting calculate the app will give you a result that is within 10% of the fish’s actual weight.  You’ll be able to calculate the weight of multiple species of fish by selecting several categories.

  • Trout, Salmon
  • Bass
  • Bluegill, Perch, Sunfish
  • Catfish, Carp
  • Muskies, Pike, Gar, Pickerel
  • Walleye, Sauger
  • Sturgeon and a general selection for calculating other species.

Included in the app is a quick reference pop-up screen to give the user the numerical conversions for fraction of an inch measurements. You’ll be able to quickly convert fractional measurements of as little as 1/16th of an inch.

In this compact little app we have also included one extra page of Catch and Release tips. Learning how to properly release a fish back into the water will greatly increase its chance of survival and your ability to catch that same fish another day.

If you need to know the weight of your fish, get the app and skip the scales, MyNature Fish Weight Calculator.

Good Luck on the Water!!

The Colors of Autumn

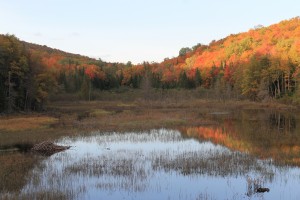
One of the most beautiful times of the year by far my favorite and also one of the least understood is Autumn. There’s no other season that comes close to matching it’s sheer beauty. Reds, yellows, oranges, browns, truly the colors of an artists palette. Still many people don’t realize that all those colors have been there all along, from the first budding of the leaves in the Springtime to the long hot days of Summer. Without sounding to scientific I’ll try to fill you in on why we only see green leaves and not the reds and yellows of Fall.
If you can think all the way back to your high school biology class day you may remember the word Chlorophyll. Chlorophyll is the green pigment produced by the leaf through the process of Photosynthesis. Through photosynthesis trees produce food (sugars) and wastes, take in carbon dioxide and release oxygen. While trees are in their growing cycle for the spring and summer months there is so much green Chlorophyll in each leaf that it dominates the other colors that are present. As Fall arrives trees begin to go into a hibernation of sorts. They stop producing chlorophyll and begin to draw all of the food out of the leaves to store it in the root system to survive the winter. As photosynthesis stops we begin to see some of the other colors(sugars and wastes) that are left in the leaf. The brown colors you see are the wastes the tree didn’t need. The colder temperatures and the length of the days turn the sugars left in the leaves the reds and purple colors we see. The yellows are carotenoids, which is another substance in the leaves that aids the chlorophyll in photosynthesis. That’s the pretty condensed version of it all but it should at least give you a basic understanding of where the colors come from and what the colors represent.

Enjoy the Outdoors!!